
TL;DR: This tutorial is also available in video format. Click here to watch it.
In today’s fast-paced software world, automation is your best friend. Our guide is your ticket to automating how you deploy your applications and improving your development process.
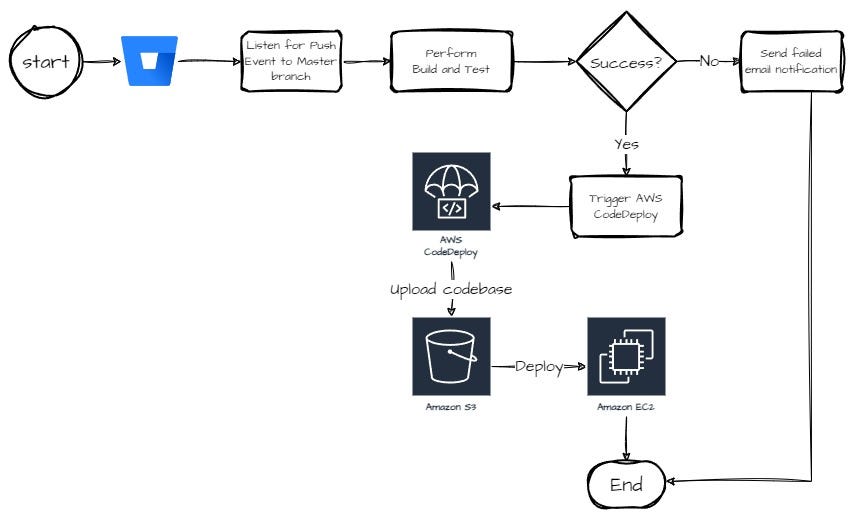
By combining the powers of AWS CodeDeploy and Bitbucket Pipelines, we’ll show you how to make continuous integration and deployment a piece of cake.
This guide will be your trusty companion as we walk you through setting up a strong deployment system. We’ll help you blend AWS and Bitbucket seamlessly to make your development process smoother and more efficient than ever before.
In this tutorial, I’ll be using ASP.NET Core Project to do CI/CD, please adjust accordingly to your needs. You can get the tutorial repository from here.
Part 1: AWS Setup
1.1 Create IAM Group
- Sign in to the AWS Management Console and open the IAM console at https://console.aws.amazon.com/iam/.
- In the navigation pane, click User Groups and then click Create New Group.
- In the Group Name box, type the group's name (bit_CodeDeployRole).
- In the list of policies, select the check box for Policy:
* AmazonS3FullAccess
* AWSCodeDeployFullAccess - Click Create Group.
1.2 Create IAM User
- Sign in to the AWS Management Console and open the IAM console at https://console.aws.amazon.com/iam/.
- In the navigation pane, click Users and then click Add User.
- Type the user name (CodeDeployUser) for the new user.
- Don’t tick “Provide user access to the AWS Management Console”.
- On the Set permissions page, select Add user to group for permission options.
- Choose the group that you’ve created in the previous step (bit_CodeDeployRole).
1.2.1 Generate Access Keys
- Sign in to the AWS Management Console and open the IAM console at https://console.aws.amazon.com/iam/.
- In the navigation pane, click Users.
- Click on the username that you want to create access keys for.
- Click on the Security Credentials tab.
- Under Access Keys, click Create Access keys
- Select the use case, fill in the description, and click Create access key
- Click Download .csv file to save your access key.
You cannot view the access keys after you leave this page.
1.3 Configure IAM Role
- Sign in to the AWS Management Console and open the IAM console at https://console.aws.amazon.com/iam/.
- In the navigation pane, click Roles and then click Create Role.
- Choose AWS service for Trusted entity type.
- Choose EC2 for the use case.
- Click Next.
- In the list of policies, select the check box for Policy:
* AmazonS3FullAccess
* AWSCodeDeployRole
* AmazonEC2FullAccess
* AmazonSSMFullAccess - Enter role name (AWSCodeDeployRole).
- Click Create Role.
- On the Roles page, click on the role that you just created.
- Click the Trust Relationship tab.
- Click Edit Trust Policy.
- Click Add Principal, choose AWS service, and fill codedeploy.ap-southeast-1.amazonaws.com for ARN (Change region accordingly)
- Click Save.
2.1 Create an AWS S3 Bucket
- Sign in to the AWS Management Console and open the Amazon S3 console at https://console.aws.amazon.com/s3/.
- Click Create Bucket.
- Type a unique name for your new bucket in the Bucket name field. Ex: bitbucket-codedeploy-deployment.
- For Region, choose Asia Pacific (Singapore) ap-southeast-1 as the region where you want the bucket to reside.
- Choose ACLs Enabled, and Bucket Owner preferred as the Bucket option.
- Click Create Bucket.
3.1 Set Up an AWS EC2 Instance
- Sign in to the AWS Management Console and open the Amazon EC2 console at https://console.aws.amazon.com/ec2/.
- Click Launch Instance.
- Fill in the name for EC2 Instance. Ex: CodeDeployDirect
- Choose the required OS Images. I’m using Microsoft Windows Server 2022 Base as I’m trying this.
- Click Create a new key pair if you don’t have any key pair. Remember to save the .pem file, you’ll need to access this instance.
- Under Network Settings, tick Allow RDP Traffic from Anywhere, Allow HTTP Traffic from Anywhere, Allow HTTPS Traffic from Anywhere.
- Under Advanced Options, choose the role that we’ve created for this (AWSCodeDeployRole) for the IAM Instance Profile.
- Click Launch Instance.
3.1.1 Connect to Instance
- Sign in to the AWS Management Console and open the Amazon EC2 console at https://console.aws.amazon.com/ec2/.
- In the navigation pane, choose Instances.
- Click on the instance that you just created.
- Click Connect.
- Click the RDP Client tab. Pick Connect using the RDP client.
Download the Remote Desktop Client file. - Click Get Password. You’ll get prompted for the key pair .pem file that we’ve done before.
- Connect to the instance using the RDP Client file.
3.1.2 Install IIS
- Open up Server Manager.
- In the navigation bar, click Add Roles or Features.
- Tick Role-based or feature-based installation.
- For Server selection, just choose the available server.
- In the Server Roles, tick the following features:
* Web Server (IIS)
* Windows Deployment Services - In the Features, tick .NET 3.5 and .NET 4.8.
- Then just click Next, and let it install.
- If you encounter errors, most probably you’ll need to install NET
Core Hosting Bundle first.
3.1.3 Install System Manager Agent
- Sign in to the AWS Management Console and open this https://console.aws.amazon.com/systems-manager/fleet-manager/dhmc.
- Enable Default Host Management Configuration.
- Choose the AWSSystemsManagerDefaultEC2InstanceManagementRole role (create it if you don’t have one).
- This will allow our instances to show up in the Fleet Manager as managed nodes. You should be able to see your instance showed up in Fleet Manager.
- Connect to the instance.
- Install SSM Agent. Follow this instructions.
- Run these commands on Powershell.
[System.Net.ServicePointManager]::SecurityProtocol = 'TLS12'
$progressPreference = 'silentlyContinue'
Invoke-WebRequest `
    https://s3.amazonaws.com/ec2-downloads-windows/SSMAgent/latest/windows_amd64/AmazonSSMAgentSetup.exe `
    -OutFile $env:USERPROFILE\Desktop\SSMAgent_latest.exe

Start-Process `
    -FilePath $env:USERPROFILE\Desktop\SSMAgent_latest.exe `
    -ArgumentList "/S"

rm -Force $env:USERPROFILE\Desktop\SSMAgent_latest.exe

Restart-Service AmazonSSMAgent
3.1.4 Install CodeDeploy Agent
- Sign in to the AWS Management Console and open this https://console.aws.amazon.com/systems-manager/distributor
- Choose AWSCodeDeployAgent and click Install one time.
- Use default options, except Target Selection.
Chooses instances manually, you should be able to choose your instance. - Click Run.
- Verify that the service is running on the instance by running this command.
powershell.exe -Command Get-Service -Name codedeployagent
4.1 Create an AWS CodeDeploy Application
- Sign in to the AWS Management Console and open the CodeDeploy Application console at https://console.aws.amazon.com/codesuite/codedeploy/applications.
- Click Create Application.
- Fill in the Application Name (e.g.: directcodedeploy) and choose EC2/On-premises as the Compute Platform.
- Under Deployment Groups, click Create Deployment Group.
- Fill necessary fields:
* Deployment Group: DG1 (Anything)
* Service Role: AWSCodeDeployRole
* Deployment Type: In-place
* Environment Configuration:
- Tick Amazon EC2 instances
- Fill in the Name for Key
- Choose the instance name in the Value field. Ex: CodeDeployDirect
- Should show 1 matching instance.
* Deployment Settings: CodeDeployDefault.OneAtATime
* Load Balancer: Disabled - Click Create Deployment Group.
Part 2: Bitbucket Configuration
1. Enable Pipelines
- Sign in to the Bitbucket and navigate to your repository.
- On the sidebar, navigate to Repository Settings.
- Under the Pipelines section, click Settings.
- Enable Pipelines.
2. Create bitbucket-pipelines.yml in the root folder of the project
The example below is for the ASP NET Core 6 Web Application.
Please update accordingly.
image: mcr.microsoft.com/dotnet/sdk:6.0
pipelines:
 default:
  - step:
    name: Build and Test
    caches:
     - dotnetcore
    script:
     - dotnet restore
     - dotnet build
     - dotnet test
  - step:
    name: Publish and Deploy
    deployment: staging
    script:
     - apt-get update && apt-get install zip -y
     - dotnet publish -c Release -o ./publish
     - cp appspec.yml ./publish/appspec.yml
     - cp before-iis-install-stop.bat ./publish/before-iis-install-stop.bat
     - cp after-iis-install-start.bat ./publish/after-iis-install-start.bat
     - cd ./publish
     - zip -r WebApp.zip .
     - pipe: atlassian/aws-code-deploy:0.2.5
      variables:
       AWS_DEFAULT_REGION: $AWS_DEFAULT_REGION
       AWS_ACCESS_KEY_ID: $AWS_ACCESS_KEY_ID
       AWS_SECRET_ACCESS_KEY: $AWS_SECRET_ACCESS_KEY
       APPLICATION_NAME: $APPLICATION_NAME
       S3_BUCKET: $S3_BUCKET
       COMMAND: "upload"
       ZIP_FILE: "WebApp.zip"
       VERSION_LABEL: "web-app-1.0.0"
     - pipe: atlassian/aws-code-deploy:0.2.5
      variables:
       AWS_DEFAULT_REGION: $AWS_DEFAULT_REGION
       AWS_ACCESS_KEY_ID: $AWS_ACCESS_KEY_ID
       AWS_SECRET_ACCESS_KEY: $AWS_SECRET_ACCESS_KEY
       APPLICATION_NAME: $APPLICATION_NAME
       DEPLOYMENT_GROUP: $DEPLOYMENT_GROUP
       S3_BUCKET: $S3_BUCKET
       COMMAND: "deploy"
       WAIT: "true"
       VERSION_LABEL: "web-app-1.0.0"
       IGNORE_APPLICATION_STOP_FAILURES: "true"
       FILE_EXISTS_BEHAVIOR: "OVERWRITE"
       DEBUG: "true"
    artifacts:
     - dist/**
3. Create appspec.yml, before-iis-install-stop.bat, and after-iis-install-start.bat in the root folder of the project
appspec.yml is to tell AWS CodeDeploy what to do in the deployment process.
before-iis-install-stop.bat will stop IIS before overwriting the files to prevent IIS from still accessing the web files.
after-iis-install-start.bat will start IIS after copying the web files.
4. Add Repository Variables
- Sign in to the Bitbucket and navigate to your repository.
- On the sidebar, navigate to Repository Settings.
- Under the Pipelines section, click Repository Variables.
- These are required variables in the bitbucket-pipelines.yml:
* AWS_ACCESS_KEY_ID
* AWS_SECRET_ACCESS_KEY
* AWS_DEFAULT_REGION
* S3_BUCKET
* APPLICATION_NAME
* DEPLOYMENT_GROUP
By following these detailed steps, you can establish a powerful and automated deployment pipeline, ensuring the smooth delivery of your applications from Bitbucket to AWS services. Say goodbye to manual deployment headaches and embrace the future of streamlined development workflows.
Happy coding and deploying!